Yesterday I posted a tool that creates a console-based graph. That command uses Write-Host which means nothing is sent to the pipeline. The only way you can really save the result is with a screen capture. Of course, you can manually use whatever screen capture program you like. If you have something like Snagit you can even capture a scrolling window which is handy if your graph is longer than your console window size.
ManageEngine ADManager Plus - Download Free Trial
Exclusive offer on ADManager Plus for US and UK regions. Claim now!
But perhaps you'd prefer a more automated approach using PowerShell. There are a number of scripts out there which you can use, including a nice one from Boe Prox which you can find here. For better or worse, alot of these scripts turn to .NET style programming. There's nothing wrong with that unless you are struggling to understand the script and lack the necessary .NET background. So I took a cue from a recipe I came across from Lee Holmes on sending keystrokes to "press" the PrintScreen button. My function then takes that output from the clipboard and saves it to a file.
Function New-ScreenShot {
#comment based help is here
[cmdletbinding(SupportsShouldProcess=$True)]
Param(
[Parameter(Position=0,Mandatory=$True,HelpMessage="Enter the path and filename")]
[ValidateNotNullorEmpty()]
[ValidateScript({
#verify the folder exists
$folder = Split-Path -Path $_
#Validation differs depending on whether v2 or v3
if ($PSVersionTable.psversion -eq "2.0") {
Test-Path -Path $folder
}
else {
if (! (Test-Path -Path $folder)) {
#write a custom error message for v3
Throw "Can't verify that $folder exists."
}
else {
$True
}
}
})]
[string]$Path,
[switch]$Full,
[switch]$Passthru
)
If ($host.Runspace.ApartmentState -ne "STA") {
Write-Warning "You must run this in a PowerShell session with an apartment state of STA"
Return
}
#load the necessary assemblies
Add-Type -AssemblyName "System.Drawing","System.Windows.Forms"
if ($Full) {
#capture the full desktop
[Windows.Forms.Sendkeys]::SendWait("{PrtSc}")
}
else {
#capture the current window
[Windows.Forms.Sendkeys]::SendWait("%{PrtSc}")
}
#pause enough to give time for the capture to take place
start-sleep -Milliseconds 250
#create bitmap object from the screenshot
$bitmap = [Windows.Forms.Clipboard]::GetImage()
#split off the file extension and use it as the type
[string]$filename=Split-Path -Path $Path -Leaf
[string]$FileExtension= $Filename.Split(".")[1].Trim()
#get the right format value based on the file extension
Switch ($FileExtension) {
"png" {$FileType=[System.Drawing.Imaging.ImageFormat]::Png}
"bmp" {$FileType=[System.Drawing.Imaging.ImageFormat]::Bmp}
"gif" {$FileType=[System.Drawing.Imaging.ImageFormat]::Gif}
"emf" {$FileType=[System.Drawing.Imaging.ImageFormat]::Emf}
"jpg" {$FileType=[System.Drawing.Imaging.ImageFormat]::Jpeg}
"tiff" {$FileType=[System.Drawing.Imaging.ImageFormat]::Tiff}
"wmf" {$FileType=[System.Drawing.Imaging.ImageFormat]::Wmf}
"exif" {$FileType=[System.Drawing.Imaging.ImageFormat]::Exif}
Default {
Write-Warning "Failed to find a valid graphic file type"
$FileType=$False
}
} #switch
#Save the file if a valid file type was determined
if ($FileType) {
If ($PSCmdlet.ShouldProcess($path)) {
Try {
$bitmap.Save($Path.Trim(),$FileType)
if ($Passthru) {
#write the file object to the pipeline
Get-Item -Path $Path.Trim()
} #if $passthru
} #try
Catch {
Write-Warning "Failed to save screen capture. $($_.Exception.Message)"
} #catch
} #if shouldprocess
} #if $filetype
#clear the clipboard
[Windows.Forms.Clipboard]::Clear()
} #end function
The function will work in both v2 and v3. One thing I've done a little differently is to add validation for the Path parameter. PowerShell v3 changed how parameters are bound and validated so in v3 I can throw a custom error message that it a bit more meaningful instead the usual, "the validation script failed".
The default behavior is to capture the current Window. But you can use -Full to capture the complete desktop. As long as you specify a valid file type, the screen shot is automatically saved. Because the function creates something new I went ahead and added support for -WhatIf. I also threw in -Passthru as most of the time you don't really need to see the output but sometimes you might.
Now that I have this tool, I can build scripts to create a console graph and snap a screen shot.
#requires -version 3.0
Param (
[string]$Path="C:\Scripts",
[string]$File="c:\work\screen.png"
)
#dot source necessary functions
. C:\scripts\Out-ConsoleGraph.ps1
. C:\scripts\New-ScreenShot.ps1
#save the current window title
$CurrentTitle = $host.ui.RawUI.WindowTitle
#set a new, temporary title
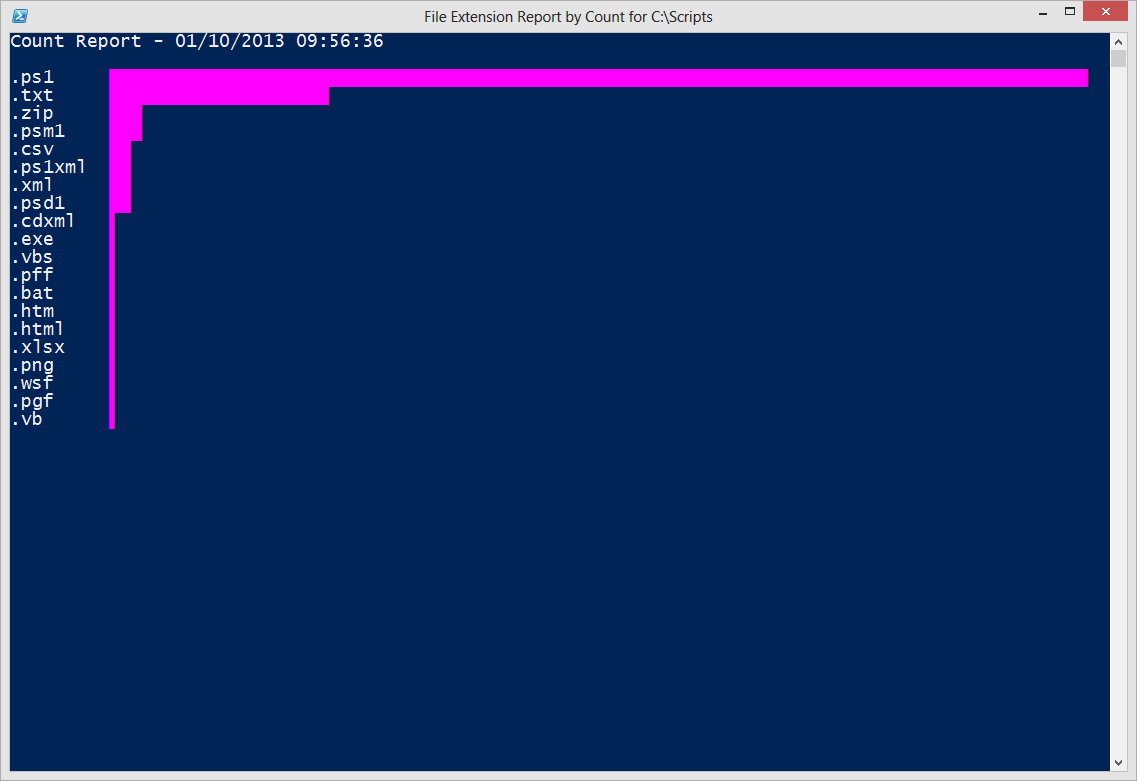
$host.ui.RawUI.WindowTitle = "File Extension Report by Count for $path"
#get all files that have an extension
$data = dir $path -Recurse -File | where Extension
$groups = $data | Group-Object -Property Extension
$groups | sort Count -Descending | Select -first 20 |
Out-ConsoleGraph -Property Count -GraphColor Magenta -ClearScreen |
New-ScreenShot -Path $file
#set the title back
$host.ui.RawUI.WindowTitle = $CurrentTitle
Because the screen shot happens before the script finishes I'm also taking advantage of the console title bar to add more information.
A few caveats: PowerShell must be run in STA mode. The function will check and warn you if the console is in the "wrong" mode. And because I'm using common key commands, this might conflict with any installed screen capture programs like Snagit. As the code says, this is a quick and dirty approach but I think it is easy to understand what each part of the function is doing.
You can download New-ScreenShot and try things our for yourself.
In case you have no restrictions on using 3rd party modules, the Save-UIAScreenshot cmdlet creates a screenshot, be default, in your TEMP folder or, alternatively, could produce an image from a window or a control.
Thanks for the suggestion. There are certainly any number of screen shot options you can incorporate. My screen shot toy is merely another choice.