Last year I wrote a series of articles for the Petri IT KnowledgeBase on using Microsoft Excel with PowerShell. Today I received an email from a reader who had a question about article that showed how to build a drive usage report in Excel. In the article I suggest it wouldn't be too difficult to modify my sample code to create a worksheet for each computer. Perhaps I was a bit too glib. So I decided to revise my sample script so that you could pass an array of computernames and build a single workbook with a named worksheet for each computer.
ManageEngine ADManager Plus - Download Free Trial
Exclusive offer on ADManager Plus for US and UK regions. Claim now!
#Requires -version 2.0
<# this version takes an array of computer names and creates a new worksheet for each one. #>
[cmdletbinding()]
Param([string[]]$computername=$env:computername)
#I hope it goes without saying that Excel needs to be installed
Write-Verbose "Creating Excel application"
$xl=New-Object -ComObject "Excel.Application"
$wb=$xl.Workbooks.Add()
#we'll need some constants
$xlConditionValues=[Microsoft.Office.Interop.Excel.XLConditionValueTypes]
$xlTheme=[Microsoft.Office.Interop.Excel.XLThemeColor]
$xlChart=[Microsoft.Office.Interop.Excel.XLChartType]
$xlIconSet=[Microsoft.Office.Interop.Excel.XLIconSet]
$xlDirection=[Microsoft.Office.Interop.Excel.XLDirection]
Foreach ($computer in $computername) {
#get disk data
Write-Verbose "Getting disk data from $computer"
$disks=Get-WmiObject -Class Win32_LogicalDisk -ComputerName $computer -Filter "DriveType=3"
Write-Verbose "Adding Worksheet"
$ws=$wb.Worksheets.Add()
$cells=$ws.Cells
$cells.item(1,1)="Disk Drive Report"
#define some variables to control navigation
$row=3
$col=1
#insert column headings
Write-Verbose "Adding drive headings"
"Drive","SizeGB","FreespaceGB","UsedGB","%Free","%Used" | foreach {
$cells.item($row,$col)=$_
$cells.item($row,$col).font.bold=$True
$col++
}
Write-Verbose "Adding drive data"
foreach ($drive in $disks) {
$row++
$col=1
$cells.item($Row,$col)=$drive.DeviceID
$col++
$cells.item($Row,$col)=$drive.Size/1GB
$cells.item($Row,$col).NumberFormat="0"
$col++
$cells.item($Row,$col)=$drive.Freespace/1GB
$cells.item($Row,$col).NumberFormat="0.00"
$col++
$cells.item($Row,$col)=($drive.Size - $drive.Freespace)/1GB
$cells.item($Row,$col).NumberFormat="0.00"
$col++
$cells.item($Row,$col)=($drive.Freespace/$drive.size)
$cells.item($Row,$col).NumberFormat="0.00%"
$col++
$cells.item($Row,$col)=($drive.Size - $drive.Freespace) / $drive.size
$cells.item($Row,$col).NumberFormat="0.00%"
}
Write-Verbose "Adding some style"
#add some style
$range=$ws.range("A1")
$range.Style="Title"
#or set it like this
$ws.Range("A3:F3").Style = "Heading 2"
#adjust some column widths
Write-Verbose "Adjusting column widths"
$ws.columns.item("C:C").columnwidth=15
$ws.columns.item("D:F").columnwidth=10.5
$ws.columns.item("B:B").EntireColumn.AutoFit() | out-null
#add some conditional formatting
Write-Verbose "Adding conditional formatting"
#get the starting cell
$start=$ws.range("F4")
#get the last cell
$Selection=$ws.Range($start,$start.End($xlDirection::xlDown))
#add the icon set
$Selection.FormatConditions.AddIconSetCondition() | Out-Null
$Selection.FormatConditions.item($($Selection.FormatConditions.Count)).SetFirstPriority()
$Selection.FormatConditions.item(1).ReverseOrder = $True
$Selection.FormatConditions.item(1).ShowIconOnly = $False
$Selection.FormatConditions.item(1).IconSet = $xlIconSet::xl3TrafficLights1
$Selection.FormatConditions.item(1).IconCriteria.Item(2).Type=$xlConditionValues::xlConditionValueNumber
$Selection.FormatConditions.item(1).IconCriteria.Item(2).Value=0.8
$Selection.FormatConditions.item(1).IconCriteria.Item(2).Operator=7
$Selection.FormatConditions.item(1).IconCriteria.Item(3).Type=$xlConditionValues::xlConditionValueNumber
$Selection.FormatConditions.item(1).IconCriteria.Item(3).Value=0.9
$Selection.FormatConditions.item(1).IconCriteria.Item(3).Operator=7
#insert a graph
Write-Verbose "Creating a graph"
$chart=$ws.Shapes.AddChart().Chart
$chart.chartType=$xlChart::xlBarClustered
$start=$ws.range("A3")
#get the last cell
$Y=$ws.Range($start,$start.End($xlDirection::xlDown))
$start=$ws.range("F3")
#get the last cell
$X=$ws.Range($start,$start.End($xlDirection::xlDown))
$chartdata=$ws.Range("A$($Y.item(1).Row):A$($Y.item($Y.count).Row),F$($X.item(1).Row):F$($X.item($X.count).Row)")
$chart.SetSourceData($chartdata)
#add labels
$chart.seriesCollection(1).Select() | Out-Null
$chart.SeriesCollection(1).ApplyDataLabels() | out-Null
#modify the chart title
$chart.ChartTitle.Text = "Utilization"
Write-Verbose "Repositioning graph"
$ws.shapes.item("Chart 1").top=40
$ws.shapes.item("Chart 1").left=400
Write-Verbose "Renaming the worksheet"
#rename the worksheet
$name=$disks[0].SystemName
$ws.Name=$name
#select A1
$ws.Range("A1").Select() | Out-Null
} #foreach
#delete extra sheets
Write-Verbose "Deleting extra worksheets"
$xl.worksheets.Item("Sheet1").Delete()
$xl.Worksheets.Item("Sheet2").Delete()
$xl.Worksheets.Item("Sheet3").Delete()
#make Excel visible
$xl.Visible=$True
$filepath=Read-Host "Enter a path and filename to save the file"
if ($filepath) {
Write-Verbose "Saving file to $filepath"
$wb.SaveAs($filepath)
$xl.displayAlerts=$False
$wb.Close()
$xl.Quit()
}
#end of script
If you looked at the original post, here are the changes I made. First, I modified the script parameters to take an array of computer names.
Param([string[]]$computername=$env:computername)
I decided to change the parameter name as well which worked out well because I could keep most of my code for each computer and simply insert a ForEach loop.
Foreach ($computer in $computername) {

    #get disk data

    Write-Verbose "Getting disk data from $computer"

    $disks=Get-WmiObject -Class Win32_LogicalDisk -ComputerName $computer -Filter "DriveType=3"

...
This also meant I needed to move some code to before this loop since I only have to create the Excel application and workbook objects once. For each computer I use WMI to get disk data and create a new worksheet.
    Write-Verbose "Adding Worksheet"

    $ws=$wb.Worksheets.Add()
The rest of the Excel-related code remains the same for each computer. But I did alter the code to rename each worksheet.
#rename the worksheet

$name=$disks[0].SystemName

$ws.Name=$name

...
I also decided to delete the "extra" sheets. Unless you've modified Excel's startup behavior new workbooks have Sheet1, Sheet2 and Sheet3 which I don't need so I delete them.
#delete extra sheets

Write-Verbose "Deleting extra worksheets"

$xl.worksheets.Item("Sheet1").Delete()

$xl.Worksheets.Item("Sheet2").Delete()

$xl.Worksheets.Item("Sheet3").Delete()
With this new script I can run a command like this:
PS Scripts:\> .\New-ExcelDiskSpace2A.ps1 -computer novo8,jdhit-dc01 -Verbose
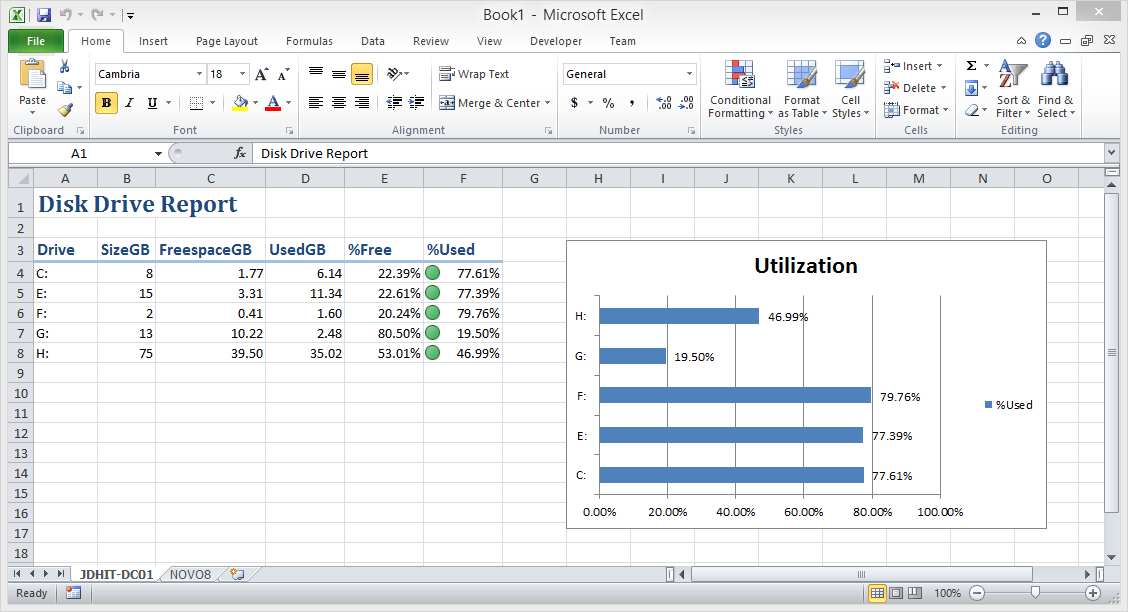
Which gives me a single workbook with a worksheet for each computer:
Download my revised script New-ExcelDiskSpace2A.
You could also use the Export-Xlsx function from http://www.lucd.info/2013/01/03/export-xls-the-sequel-and-ordered-data/
Thanks for the link. The point of the original series was to demonstrate how to use Excel with PowerShell. The script in this post isn’t necessarily designed as a finished, production ready tool but rather as a proof of concept.
Very nice, I have been working with PowerShell and Excel for a couple of years. I really like the way it works and the clean reports you get. I work in a corporate environment where Excel Macros are forbidden, so this is my way of recording “Macros”.
That’s a good way of looking at it. Thanks for taking the time to comment.
What would I have to do to get the computer names from a file?
Use Get-Content. I typically use a command like this to avoid any blank lines:
get-content c:\work\computers.txt | where {$_} | do something with each name
Or even more thorough would be to use a regular expression.
get-content c:\work\computers.txt | where {$_ -match “^\S+$”} | do something with each name
Thanks Jeff, I would also have to change the Foreach ($computer in $computername) string as well?
Maybe. It depends on how you are using the text file. Are you trying to modify the script or use it with a list of computers?
Can’t you do this?
PS C:\> $computers = get-content c:\work\computers.txt | where {$_ -match “^\S+$”}
PS C:\> c:\scripts\New-ExcelDiskSpace2A.ps1 -computer $computers
Hi Jeff, I would like to modify the script (awesome job on it) so I can just add to the text file if I want to add another machine…
I see. All you need to do is set a new default value for the computername parameter. Try this:
Param([string[]]$computername=(get-content YOUR-PATH\YOUR-FILE.txt | where {$_ -match "^\S+$"}))
Jeff, your a hero, works like a champ… I am still a noobee at this stuff so the help is much appreciated…
The only thing left for me is possibly appending server data to the excel spreadsheet for historical information and send it via an e-mail.. I should be able to handle that…