When we left my project, the new mini server had booted up using Windows Hyper-V Server 2012 R2. This is a server core installation intended to only run Hyper-V, which is perfect for my needs. The server booted up with a temporary name and a DHCP assigned IP address. The next step is configure the server and join it to my test domain.
ManageEngine ADManager Plus - Download Free Trial
Exclusive offer on ADManager Plus for US and UK regions. Claim now!
I could do this all interactively using the sconfig script, but where's the challenge in that! So I'm going to configure the server from a Windows 8 client with RSAT installed in my target domain. There are ways to configure Hyper-V in workgroup environment but I want to take advantage of domain. It shouldn't really make any difference but my test domain, Globomantics.local, is running in a Hyper-V environment on my Windows 8 laptop. My mini Hyper-V server will belong to this domain, as will any virtual machines it ends up hosting.
To get started I know the IP address of the new server and credentials for the local administrator account. With this I can use PowerShell remoting, since it is enabled by default in Windows Server 2012. However, on my client, I need to temporarily add the host to the TrustedHosts list. Otherwise, the client won't trust the server and I won't be able to connect. In an elevated I'll run this command.
set-item WSMan:\localhost\Client\TrustedHosts -Value 172.16.* -Force
Using -Force suppresses confirmation prompts. This setting will allow me to connect to any host using an IP address that starts with 172.16. I should now be able to use Invoke-Command or run any configuration workflows. In fact, I'm going to use some basic workflows to set the computer name and IP configuration. First, I'll verify remote connectivity.
PS C:\Windows\system32> test-wsman 172.16.10.122
wsmid           : http://schemas.dmtf.org/wbem/wsman/identity/1/wsmanidentity.xsd
ProtocolVersion : http://schemas.dmtf.org/wbem/wsman/1/wsman.xsd
ProductVendor   : Microsoft Corporation
ProductVersion  : OS: 0.0.0 SP: 0.0 Stack: 3.0
Looks good. Next, I'll define some PowerShell variables to use with my workflows.
$oldIP="172.16.10.122"
$newIP="172.16.30.212"
$NewServerName = "CHI-HVR2"
$domaincredential=Get-Credential "globomantics\administrator"
$remotecredential=Get-Credential "$oldIP\administrator"
The first workflow I want to run will perform some basic configuration.
Workflow Set-StandardConfig {

Write-Verbose -Message "Running parallel tasks"

 Parallel {
     #these are relatively simple tasks that can run simultaneously
     #create folders
     New-Item -Path C:\Scripts -ItemType Directory
     New-Item -Path C:\Work -ItemType Directory

     #add features
     Add-WindowsFeature -Name Windows-Server-Backup

     #set execution policy
     Set-ExecutionPolicy -ExecutionPolicy RemoteSigned -Force

     #set the time zone
     TZUTIL /s "Eastern Standard Time"

 } #parallel

} #end workflow
Once this workflow is loaded into my session I can run it and configure the new server.
Set-StandardConfig -PSComputerName $oldIP -PSCredential $remotecredential
Next, I want to configure the IP configuration. The new server only has a single NIC which simplifies matters a great deal. Here's the workflow I'm going to use.
WorkFlow Set-IPConfiguration {

Param(
[string]$NewName,
[string]$IPAddress,
[int]$Prefix=16,
[string]$Gateway,
[string[]]$DNSServers
)

Write-Verbose -Message "Starting $($workflowcommandname)"

#set IP Address
#assumes a single NIC

$nic = Get-NetAdapter

#set DNS
Write-Verbose -Message "Configuring DNS"
$nic | Set-DnsClientServerAddress -ServerAddresses $DNSServers

#configure network connection profile
Write-Verbose -Message "Configuring network connection profile"
Get-NetConnectionProfile | Set-NetConnectionProfile -NetworkCategory Private

Write-Verbose -Message "Configuring adapter"
if ($Gateway) {
    $nic | New-NetIPAddress -IPAddress $IPAddress -PrefixLength $Prefix  -AddressFamily IPv4  -DefaultGateway $Gateway
}
else {
    $nic | New-NetIPAddress -IPAddress $IPAddress -PrefixLength $Prefix  -AddressFamily IPv4
}

#let the workflow end since we will lose connectivity

} #end workflow
To execute, I'll splat a hashtable of parameters to it.
$ipParams=@{
IPAddress= $newIP
Gateway= "172.16.10.254"
DNSServers= "172.16.30.200","172.16.30.203"
PSComputerName= $oldIP
PSCredential= $remotecredential
Verbose= $True
}

Set-IPConfiguration @ipParams
One caveat here is that when you change the IP address you'll lose your connection to the remote computer. PowerShell will keep retrying. What I probably should have done was to include some parameters to limit the retry count. Eventually, the command will timeout and I can continue.
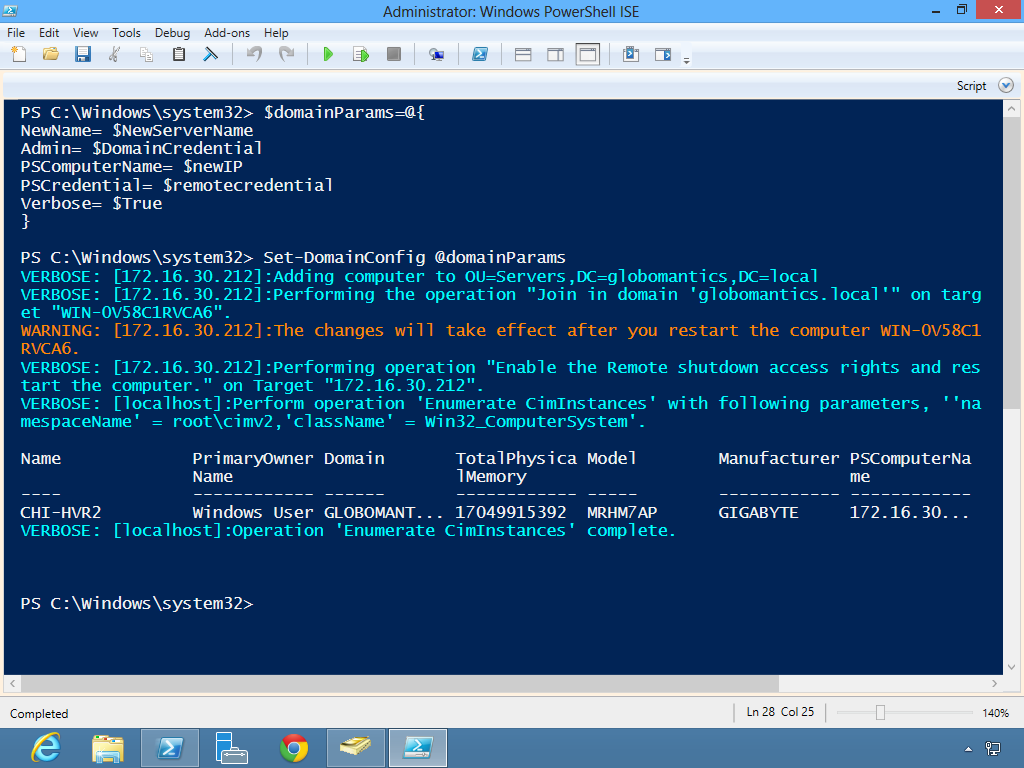
Next, I want to rename the computer and join it to the domain.
WorkFlow Set-DomainConfig {

Param(
[string]$NewName,
[string]$Domain='globomantics.local',
[PSCredential]$Admin,
[string]$OU="OU=Servers,DC=globomantics,DC=local"

)

Write-Verbose -Message "Adding computer to $OU"
Add-Computer -DomainName $domain -OUPath $OU -Credential $Admin -NewName $NewName -Force

Restart-Computer -Wait -Force

#verify
Get-CimInstance -ClassName Win32_ComputerSystem

} #end workflow
Again, I'll splat a hashtable of parameters, this time connecting to the new IP address.
$domainParams=@{
NewName= $NewServerName
Admin= $DomainCredential
PSComputerName= $newIP
PSCredential= $remotecredential
Verbose= $True
}

Set-DomainConfig @domainParams
Eventually the computer will reboot and I'll get a positive result.
Excellent. Now that the server has rebooted it belongs to the domain and I can use the new name to verify a few things.
$cs = New-CimSession -ComputerName "chi-hvr2.globomantics.local"
Get-NetAdapter -CimSession $cs  | Get-NetIPAddress
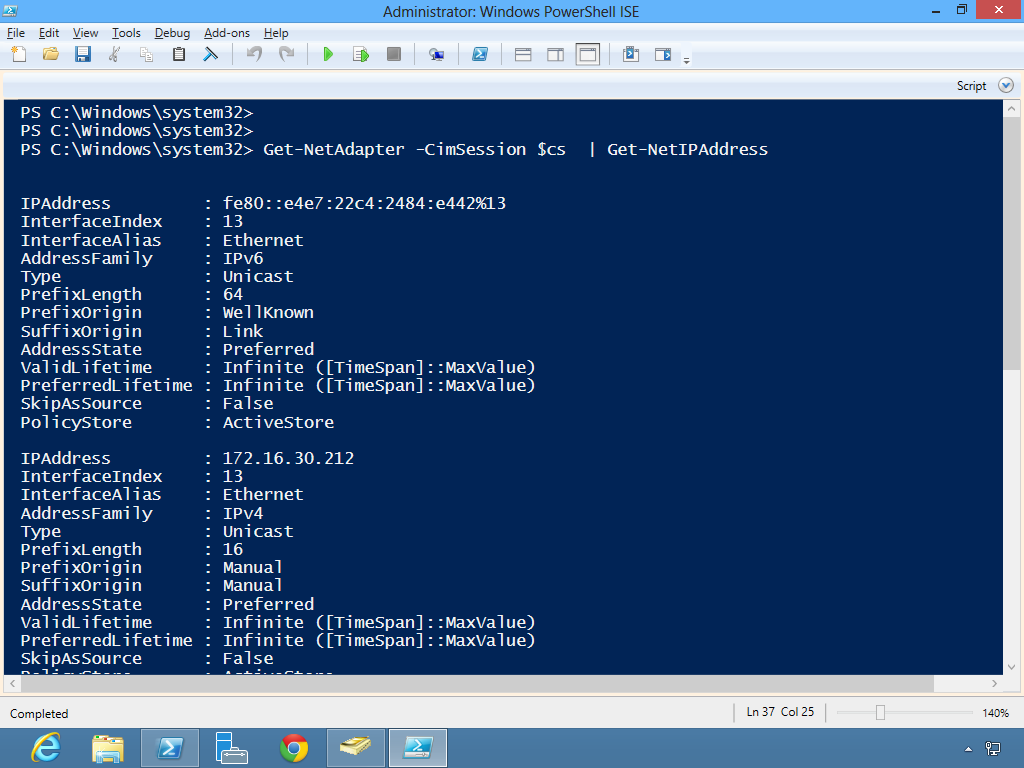
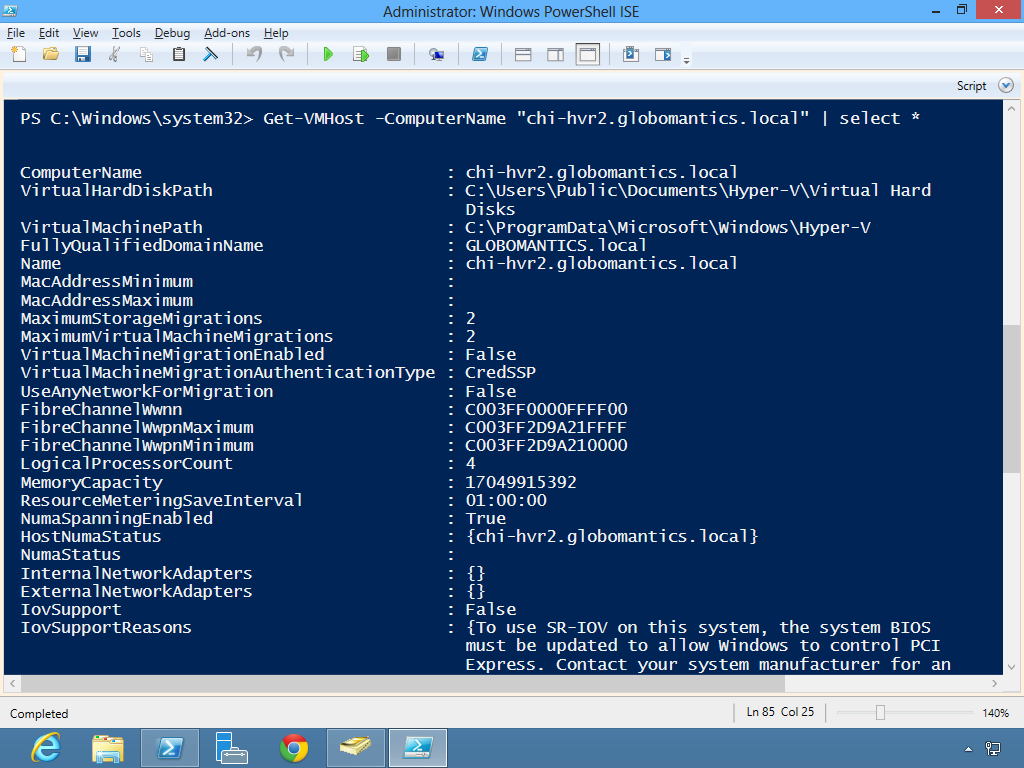
I used the new server's FQDN for the CIMSession name as I couldn't get the NETBIOS name to work. Probably because I didn't wait long enough for browser stats to get updated. Anyway, it works and I can also verify Hyper-V is working.
Get-VMHost -ComputerName "chi-hvr2.globomantics.local" | select *
The last thing I should do is remove the trusted hosts settings on the client. But because I trust my network and I might need to do this again, I think I'll leave it for now. But I did it! I now have a Hyper-V server ready for me to use.
2 thoughts on “Mini Hyper-V: Operating System”
Comments are closed.