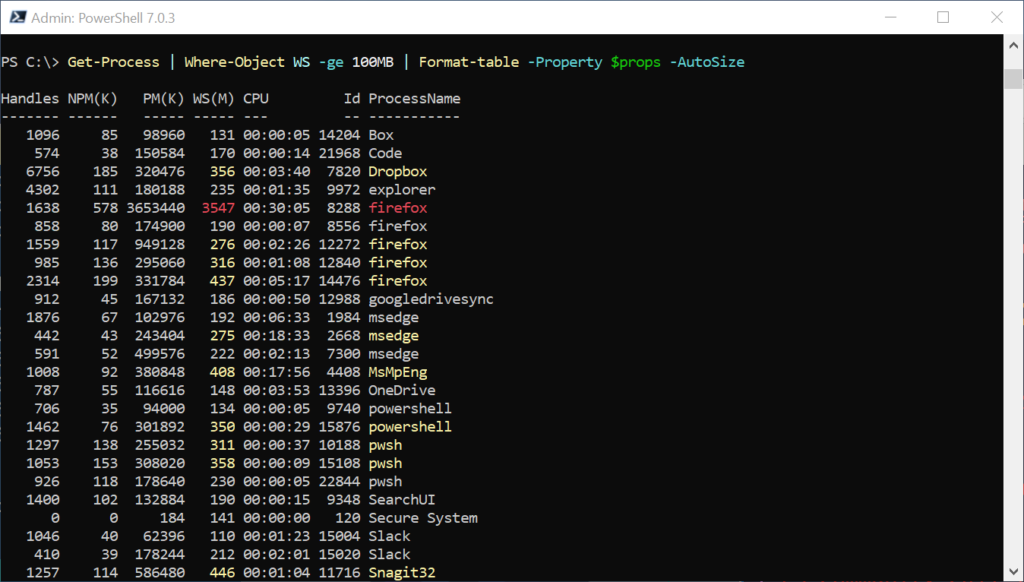
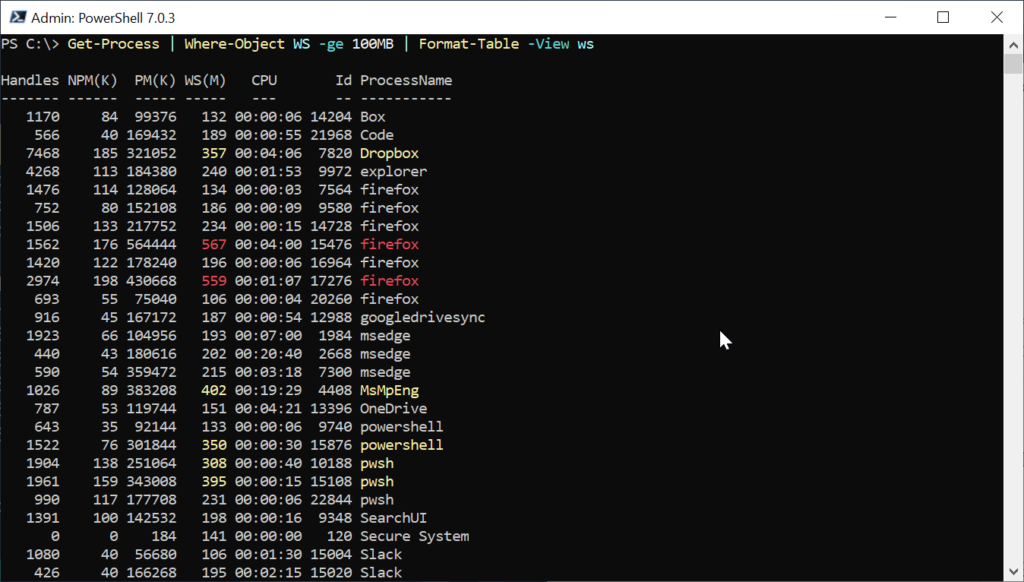
One of the features I truly enjoy about PowerShell, is the ability to have it present information that I need in a form that I want. Here's a good example. Running Get-Process is simple enough and the output is pretty complete. But one thing that would make it better for me, is that sometimes I want an easy way to see high-memory use properties. Yes, I can pipe Get-Process to Sort-Object and Where-Object. However, in this particular situation, what I really want is to see high-memory usage processes displayed in red. Maybe those that are getting close to my arbitrary limit I'd like to see in Yellow. This isn't that difficult to achieve using ANSI escape sequences.
ManageEngine ADManager Plus - Download Free Trial
Exclusive offer on ADManager Plus for US and UK regions. Claim now!
To try this out, I defined an array of custom properties that in essence duplicates the default output from Get-Process.
$props = @(
    "Handles",
    @{Name = "NPM(K)"; Expression = { [int]($_.npm / 1kb) } },
    @{Name = "PM(K)"; Expression = { [int]($_.pm / 1kb) } },
    @{Name = "WS(M)"; Expression = {
            if ($_.ws -ge 500MB) {
                "$([char]0x1b)[91m$([int]($_.ws/1mb))$([char]0x1b)[0m"
            }
            elseif ($_.ws -ge 250MB) {
                "$([char]0x1b)[93m$([int]($_.ws/1mb))$([char]0x1b)[0m"
            }
            else {
                [int]($_.ws / 1mb)
            }
        }
    },
    @{Name = "CPU"; Expression = { New-TimeSpan -Seconds $_.cpu } },
    "ID",
    @{Name = "ProcessName"; Expression = {
            if ($_.ws -ge 500MB) {
                "$([char]0x1b)[1;91m$($_.processname)$([char]0x1b)[0m"
            }
            elseif ($_.ws -ge 250MB) {
                "$([char]0x1b)[1;93m$($_.processname)$([char]0x1b)[0m"
            }
            else {
                $_.processname
            }
        }
    }
)
The custom properties are defined as hashtables, just as you would when using Select-Object. In this code, if the WorkingSet value is greater or equal to MB then the WS and Process name values are formatted in red using an ANSI escape sequence that will work in both Windows PowerShell and PowerShell 7.
"$([char]0x1b)[1;91m$($_.processname)$([char]0x1b)[0m"I also renamed the WS heading to reflect the value in MB as an [INT]. And while I was at it, I realized the CPU property is really a number of seconds, so I'll display it as a timespan.
@{Name = "CPU"; Expression = { New-TimeSpan -Seconds $_.cpu } }With this array loaded into my PowerShell session, I can run a command like this.
Get-Process | Where-Object WS -ge 100MB | Format-Table -Property $props -AutoSizeI added some filtering to make the screen shot easier to read.

Now for the fun part.
I don't want to have to type all of that code for the custom properties. One thing I can do is create a custom table view with a name like WS. Custom formatting is done with a .ps1xml file. Yes. XML. But I made it an easy process and last week I made it even easier.
The PSScriptTools module, which you can download from the PowerShell Gallery, has a command called New-PSFormatXML. The premise is that you pipe a sample object to the command, specifying what type of custom formatting you want, including properties, and it will create the .ps1xml file for you. Last week, I added the ability to support scriptblocks which will automatically create the ScriptBlock tags in the file. In previous versions, you had to manually create them. With the PSScriptTools module installed, I can run a command like this to generate a file, using my previously defined array of custom properties.
Get-Process -Id $pid | New-PSFormatXML -Properties $props -ViewName WS -FormatType Table -Path c:\scripts\wsprocess.format.ps1xml -PassthruThe function only needs a single object. By the way, if you run this command in VSCode and use the -Passthru parameter, the new .ps1xml file will automatically be opened. Here's my result.
<?xml version="1.0" encoding="UTF-8"?>
<!--
Format type data generated 10/11/2020 13:02:12 by PROSPERO\Jeff
This file was created using the New-PSFormatXML command that is part
of the PSScriptTools module.
https://github.com/jdhitsolutions/PSScriptTools
-->
<Configuration>
  <ViewDefinitions>
    <View>
      <!--Created 10/11/2020 13:02:12 by PROSPERO\Jeff-->
      <Name>WS</Name>
      <ViewSelectedBy>
        <TypeName>System.Diagnostics.Process</TypeName>
      </ViewSelectedBy>
      <TableControl>
        <!--Delete the AutoSize node if you want to use the defined widths.-->
        <AutoSize />
        <TableHeaders>
          <TableColumnHeader>
            <Label>Handles</Label>
            <Width>10</Width>
            <Alignment>right</Alignment>
          </TableColumnHeader>
          <TableColumnHeader>
            <Label>NPM(K)</Label>
            <Width>20</Width>
            <Alignment>right</Alignment>
          </TableColumnHeader>
          <TableColumnHeader>
            <Label>PM(K)</Label>
            <Width>19</Width>
            <Alignment>right</Alignment>
          </TableColumnHeader>
          <TableColumnHeader>
            <Label>WS(M)</Label>
            <Width>212</Width>
            <Alignment>right</Alignment>
          </TableColumnHeader>
          <TableColumnHeader>
            <Label>CPU</Label>
            <Width>31</Width>
            <Alignment>center</Alignment>
          </TableColumnHeader>
          <TableColumnHeader>
            <Label>Id</Label>
            <Width>8</Width>
            <Alignment>right</Alignment>
          </TableColumnHeader>
          <TableColumnHeader>
            <Label>ProcessName</Label>
            <Width>210</Width>
            <Alignment>left</Alignment>
          </TableColumnHeader>
        </TableHeaders>
        <TableRowEntries>
          <TableRowEntry>
            <TableColumnItems>
              <TableColumnItem>
                <PropertyName>Handles</PropertyName>
              </TableColumnItem>
              <TableColumnItem>
                <ScriptBlock>[int]($_.npm/1kb)</ScriptBlock>
              </TableColumnItem>
              <TableColumnItem>
                <ScriptBlock>[int]($_.pm/1kb)</ScriptBlock>
              </TableColumnItem>
              <TableColumnItem>
                <ScriptBlock>
                  if ($_.ws -ge 500MB) {
                      "$([char]0x1b)[91m$([int]($_.ws/1mb))$([char]0x1b)[0m"
                  }
                  elseif ($_.ws -ge 250MB) {
                      "$([char]0x1b)[93m$([int]($_.ws/1mb))$([char]0x1b)[0m"
                  }
                  else {
                      [int]($_.ws/1mb)
                  }
                </ScriptBlock>
              </TableColumnItem>
              <TableColumnItem>
                <ScriptBlock>New-Timespan -Seconds $_.cpu</ScriptBlock>
              </TableColumnItem>
              <TableColumnItem>
                <PropertyName>Id</PropertyName>
              </TableColumnItem>
              <TableColumnItem>
                <ScriptBlock>
                  if ($_.ws -ge 500MB) {
                      "$([char]0x1b)[1;91m$($_.processname)$([char]0x1b)[0m"
                  }
                  elseif ($_.ws -ge 250MB) {
                      "$([char]0x1b)[1;93m$($_.processname)$([char]0x1b)[0m"
                  }
                  else {
                      $_.processname
                  }
                </ScriptBlock>
              </TableColumnItem>
            </TableColumnItems>
          </TableRowEntry>
        </TableRowEntries>
      </TableControl>
    </View>
  </ViewDefinitions>
</Configuration>
The .ps1xml file defaults to auto-sizing, which is fine with me. All that I have to do is load the file into my PowerShell session.
Update-FormatData C:\scripts\wsprocess.format.ps1xmlThis file has no effect if I simply run Get-Process. But if I want to use it, all I need to do is specify the view name.
Get-Process | Where-Object WS -ge 100MB | Format-Table -View wsAgain, I added some filtering for the sake of the demo.

If I want this to always be available, I can put the Update-FormatData expression into my PowerShell profile script. And as a reminder, when you pipe to one of the format cmdlets, you're telling PowerShell all you want is something pretty to look at. You can't pipe again to a command Sort-Object or Export-CSV. All you can do is pipe the output to Out-File or Out-Printer.
Now I have PowerShell doing my work for me. I can tell at a glance what processes are using the most memory, Heck, I could take this concept a step further and define a "cheater" function in my profile.
function ws { Get-Process | Format-Table -view ws}I'm only going to use this interactively in my console so the fact that I'm not following the verb-noun naming convention is irrelevant.
I could modify the ps1xml further. Here are some things I (or you) might consider:
- Remove AutoSize and adjust column widths.
- Modify other properties like PM and format them as MB.
- Add a property like Runtime.
- Make my colorized view the default for Process objects.
I'd love to hear what custom formatting you came up with and what problems it solved.

1 thought on “Easy PowerShell Custom Formatting”
Comments are closed.