 I've been working on a project for a client that includes creating an HTML report, generated by PowerShell. I originally thought I would include a certain feature but decided against it. However, this is so cool I thought I'd share it with you as a Friday Fun article. I've done alot this year with some advanced HTML scripting techniques and this one might come in handy.
ManageEngine ADManager Plus - Download Free Trial
Exclusive offer on ADManager Plus for US and UK regions. Claim now!
I'm always looking for ways to add visual reinforcement to my HTML reports. And since keeping track of disk space is a common IT Pro task, I figured it would be nice to have a visual representation on disk utilization. So I created a short proof of concept script that generates an HTML report like this:
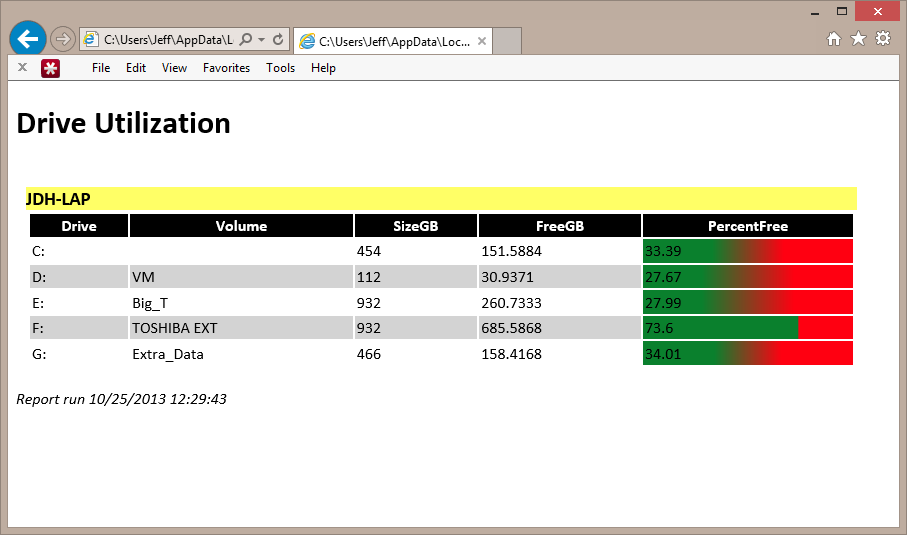
What do you think? Here's how I did it.
#requires -version 3.0

<#
proof of concept using an HTML gradient.
#>

[cmdletbinding()]
Param(
[string]$Computername=$env:computername,
[string]$ReportTitle="Drive Utilization Report",
[string]$Path="$env:temp\utilization.htm"
)

#define HTML header with style elements
$head = @'
<style>
body { background-color:#FFFFFF;
       font-family:Calibri;
       font-size:12pt; }
td, th { border:0px solid black;
         border-collapse:collapse; }
th { color:white;
     background-color:black; }
table, tr, td, th { padding: 2px; margin: 0px }
tr:nth-child(odd) {background-color: lightgray}
table {
width:95%;
margin-left:10px;
margin-bottom:20px;
}
caption
{
background-color:#FFFF66;
text-align:left;
font-weight:bold;
font-size:14pt;
}
</style>
'@

 <#
 Define a here string for coloring percentage cells.
 The starting and ending percents will need to provided
 using the -f operator.
 #>
$gradient=@"
filter:progid:DXImageTransform.Microsoft.Gradient(GradientType=0,
StartColorStr=#0A802D, EndColorStr=#FF0011)
background-color: #376C46;
background-image: -mso-linear-gradient(left, #0A802D {0}%, #FF0011 {1}%);
background-image: -ms-linear-gradient(left, #0A802D {0}%, #FF0011 {1}%);
background-image: -moz-linear-gradient(left, #0A802D {0}%, #FF0011 {1}%);
background-image: -o-linear-gradient(left, #0A802D {0}%, #FF0011 {1}%);
background-image: -webkit-linear-gradient(left, #0A802D {0}%, #FF0011 {1}%);
background-image: linear-gradient(left, #0A802D {0}%, #FF0011 {1}%);
"@

#define an array to hold HTML fragments
$fragments=@()

#get the data for the report
$data = Get-CimInstance Win32_logicaldisk -filter "drivetype=3" -ComputerName $computername

#Create a custom object for each drive
$drives = foreach ($item in $data) {
    $prophash = [ordered]@{
    Drive = $item.DeviceID
    Volume = $item.VolumeName
    SizeGB = $item.size/1GB -as [int]
    FreeGB = "{0:N4}" -f ($item.Freespace/1GB)
    PercentFree = [math]::Round(($item.Freespace/$item.size) * 100,2)
    }
    New-Object PSObject -Property $prophash
} #foreach item

#convert drive objects to HTML but as an XML document
[xml]$html = $drives | ConvertTo-Html -Fragment

#add the computer name as the table caption
$caption= $html.CreateElement("caption")
$html.table.AppendChild($caption) | Out-Null
$html.table.caption= $data[0].SystemName

#go through rows again and add gradient
for ($i=1;$i -le $html.table.tr.count-1;$i++) {
  $class = $html.CreateAttribute("style")
  [int]$start = $html.table.tr[$i].td[-1]
  #create the gradient using starting and ending values
  #based on %free
  $class.value = $Gradient -f $start,(100-$start)
  $html.table.tr[$i].ChildNodes[4].Attributes.Append($class) | Out-Null
} #for

#add the html to the fragments
$fragments+= $html.InnerXml

#include a footer
$fragments+="<I>Report run $(Get-Date)</I>"

#create the final report
ConvertTo-HTML -head $head -title $reportTitle -PreContent "<h1>Drive Utilization</h1>" -PostContent $fragments |
Out-File -FilePath $path -Encoding ascii
The key element here is the addition of a gradient. In the script you can see that I've defined a here string for the gradient. The string includes code to support just about any browser, that's why you see all the background-image lines. The here string also has place holders, {0} and {1} for the starting and ending percentages. I'll explain how that works in a moment.
Using Get-CIMInstance, the script gets fixed logical disks. Now, instead of simply creating an HTML fragment, I create the fragment as an XML document. This allows me to add a caption to the table, using the computer name. Then I iterate through the table node, skipping the first row which is the table header. I create an attribute called Style.
for ($i=1;$i -le $html.table.tr.count-1;$i++) {
  $class = $html.CreateAttribute("style")
...
Next, I get the value of the last
[int]$start = $html.table.tr[$i].td[-1]
I can use this value and plug it in to my gradient here string using the -f operator.
$class.value = $Gradient -f $start,(100-$start)
I append the style attribute to each node. This allows me to set different values for each drive.
$html.table.tr[$i].ChildNodes[4].Attributes.Append($class) | Out-Null
After going through the table rows, all that remains is to add the modified HTML, which is the InnerXML property to my array of fragments and create the final report.
The gradient isn't absolute but it gives you a rough visual approximation of how much free space is on each drive. By the way, you can also use the gradient in the body element of a style sheet if you want to jazz up the background of your report.
I included plenty of comments in my code which I hope helps. If not, please leave a comment. Enjoy!
9 thoughts on “Friday Fun: 50 Shades of PowerShell HTML Reports”
Comments are closed.
Awesome post ! Thanks for sharing Jeff
awesome! works like a champ
Glad to hear. It wouldn’t take much more work to turn this into a function that could process multiple computers and create a single report.
Very cool!
Is this script Powershell 4.0 only as Get-CimInstance throws an error on my Windows 7 SP1 laptop which runs PowerShell v3.7.0.92 according to Get-Host ?
I’m slightly confused as the 1st line of your script (which looks pretty cool, btw!) says -requires version 3.0 ?
This does NOT require PowerShell v4 although it should run on v4. The #requires line at the beginning tells PowerShell not to run the script on anything older than PowerShell 3.0 because I’m using Get-CimInstance which was introduced in v3. But what puzzles me is your version number. Get-Host should just show 3.0. If you look at $psversiontable, what do you see for PSVersion? Or what is the error you are getting?